Desktop automation strategies and best practices using image locators, keyboard navigation, OCR, and accessibility locators
How to automate a desktop application with Robocorp? What are the strengths and the weaknesses of the different strategies? Are there best practices?
Desktop automation imitates a human operator controlling a desktop interface. This includes opening and closing applications, simulating mouse movements and clicks, plus triggering keyboard keys and shortcuts.
Let’s look at the following options for desktop automation:
- Image locators: Using screenshots to find elements
- Keyboard navigation: Using key combinations, typing text
- OCR (optical character recognition): Reading text from the screen
- Textual locators: Accessing the elements by their accessibility names and other attributes
Image locators
The image locator strategy is based on taking screenshots of the graphical user interface (GUI) elements. The robot uses those captured screenshots to find the elements on the screen. The robot is instructed what to do when an element is found or not found. The action could be, for example, clicking on the element when it appears or waiting for it to disappear before continuing.
An image locator example
The following animation displays a robot using VS Code (with Robocorp extensions) user interface, image locators, keyboard, and OCR to create and run a new robot(!):
This is what the robot task looks like in Robot Framework syntax:
*** Tasks ***
Create and run a robot using VS Code, image locators, keyboard, and OCR
    ${new_robot_dir}=    Create new robot dir
    Open VS Code    ${new_robot_dir}
    Open Command Palette
    Create robot
    Select standard template
    Enter robot name
    Open Command Palette
    Run robot
This robot really exists! You can view the robot code at https://github.com/robocorp/example-vs-code-robot.
Image locators require a screenshot of an element or any section of the screen. For example, this Run a Command… widget on VS Code welcome screen:
It is possible to give a name for the image locator. The locator metadata is stored in JSON format. Using the Run a Command… screenshot as an example, the JSON for a locator called VSCode.RunCommand looks like this:
{
  "VSCode.RunCommand": {
    "confidence": 80.0,
    "path": ".images/RunCommand.png",
    "type": "image"
  }
}
The robot code using the VSCode.RunCommand locator looks like this:
*** Keywords ***
Open Command Palette
    Wait and click    alias:VSCode.RunCommand
Strengths
- Image locators can target any visual elements on all major platforms (Windows, Linux, macOS).
- Image locators work without physical access to the application or the operating system (e.g., Citrix) as long as an image of the screen is available. The operating system or the application under automation does not matter.
- Image locators help determine the completion of actions based on what is or is not on the screen: a button becomes visible, a progress bar disappears, etc.
Weaknesses
- Image locators fail if the visuals change too much (layout, fonts, icons, colors, resolution).
- Multiple screenshots of the same elements are needed if the locator needs to work with elements that have multiple states (e.g., an active button vs. an inactive button) since a different color or background color often conveys the element state.
- The application state (and thus the GUI) might differ on application start requiring some robot logic for resetting a known start state.
Keyboard navigation
Opening windows and dialogs, executing tasks, and navigating can be done without a mouse if the application provides access to all the core functionality using the keyboard.
A keyboard navigation example
This robot keyword uses a shortcut key combination (Ctrl+Shift+P) to open the VS Code Command Palette:
*** Keywords ***
Open Command Palette
    Press Keys    ctrl    shift    p
This keyword runs the robot by typing the run command and pressing Enter:
*** Keywords ***
Run robot
    Type and run    robocorp-run-robot
Strengths
- Keyboard shortcuts change less often than visual user interfaces, making them more robust than image locators. Even if the screen resolution, colors, or fonts change, keyboard shortcuts usually stay the same.
- Keyboard shortcuts are easy to test manually, making development faster compared to creating image-based locators.
Weaknesses
- All applications do not have sufficient keyboard support.
- Keyboard shortcuts are excellent for triggering actions, but there are no shortcuts for determining when a slow action has been completed.
- Keyboard navigation needs to be used together with either image or OCR locators to assert the completion of slow operations.
OCR
OCR locators work by extracting and matching text on the screen. The locator can be written in plain text (e.g., “Submit”). The robot will find the text on the screen programmatically.
An optical character recognition example
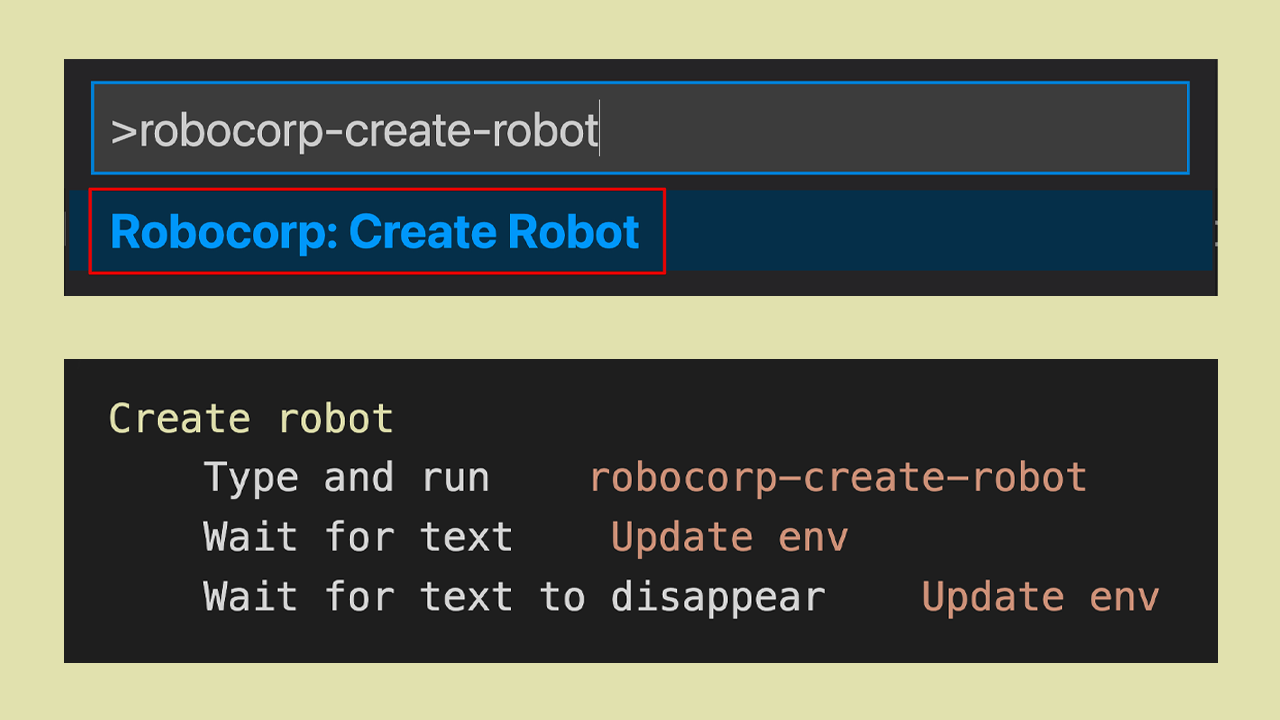
This keyword uses OCR (to read text from the screen) to determine when a slow action has been completed. After executing the robot creation command on the VS Code UI, the robot waits for the environment update notification (Update env) to appear and then disappear to indicate the completion of the action:
*** Keywords ***
Create robot
    Type and run    robocorp-create-robot
    Wait for text    Update env
    Wait for text to disappear    Update env
Strengths
- An OCR locator is plain text and thus easy to implement.
- OCR locators can be somewhat more resilient against some visual UI changes than image locators (resolution, layout, color).
Weaknesses
- OCR locators can fail due to a lack of contrast or UI effects such as shadows and transparency.
- OCR locators require unique matches. If there are no unique texts on the screen, one needs to target specific parts of the screen to narrow down the results, making the locator less resilient against visual changes.
Textual locators (Windows accessibility locators)
Some Windows applications can be automated by targeting the actual UI elements within them, referring to them by their textual UI accessibility identifiers.
Strengths
- Accessibility locators are resilient to visual changes. The identifiers usually stay the same across operating system versions.
Weaknesses
- Not all Windows applications can be inspected for accessibility locators.
- If the application is accessed remotely using Citrix or a similar protocol, the accessibility identifiers are unavailable.
Best practices for desktop automation
- Instead of waiting an exact amount of time between actions, utilize the intelligent waiting capabilities. Most of the locators support some sort of “wait for this element” functionality. Using the built-in waiting makes the robot wait for the elements just long enough before proceeding.
- Prefer strategies that do not rely on the exact visual representation of the graphical user interface. Using keyboard shortcuts and accessibility locators might produce more robust automation compared to image locators and OCR.
- If possible, try to run the desktop automation in an environment where you can make sure the application configuration and visuals remain unchanged.
Which strategy to choose?
In practice, a combination of multiple strategies is needed. Use the strengths, be mindful of the weaknesses, and combine the strategies to build a robot that does what it’s supposed to do and is quite resilient against moderate changes in the UI.
Alternative strategies
Robocorp is an open platform based on Python. This makes it possible to import and use the libraries you want or even implement your own. Out-of-the-box support is provided for all the automation strategies, but you are not limited to those. Use the power of the Python ecosystem!