A Quick Guide: How Do You Make a Robot in Python?
Improve process quality, speed and productivity to meet demanding workloads by creating a robot in Python.

Robotic process automation (RPA) is fast growing, with predicted increases expected to stay in the double digits through 2023, according to a report published by Gartner. RPA has shown its ability to increase productivity, reduce human error and scale with greater ease, so it is a natural next step to transition your Python automations to RPA.
Python scripts are an easy way to automate processes with high-quality libraries that are freely available for a variety of purposes, including automations for:
- Desktops
- Web applications
- MS Office
- API’s and more
Python is said to be the native language of artificial intelligence (AI) and machine learning due to the large amount of AI research completed with Python. This coupled with its ability to integrate or automate with just about every system makes it a powerful ally to RPA.
When you automate with Python, the process usually starts from the ground up but lacks two critical components: a master plan and infrastructure. As a result, it’s just a single employee or a small team automating a task, which creates various challenges, including work that is trapped in silos.
Breaking down silos
If you want the full benefits of automation, you need to break free from processes that reside with a single user or team and distribute automation to the entire organization. It’s not enough for two out of ten employees to fill out reports with their self-made automation scripts. For maximum results you need to centralize your RPA efforts to eliminate these silos and create a higher level of integration across your organization. At a minimum, your scripts should be:
- Distributed and used by all users
- Automatically updated when changes are required
- Monitored
- Validated for correct functionality
- Reviewed against security standards
But how do you do it?
Python is an amazing language for implementing automation scripts, but let’s look at an example to understand how it plays out. Here is a Python script that downloads currency rates from the ECB website and stores them in an .xlsx file.
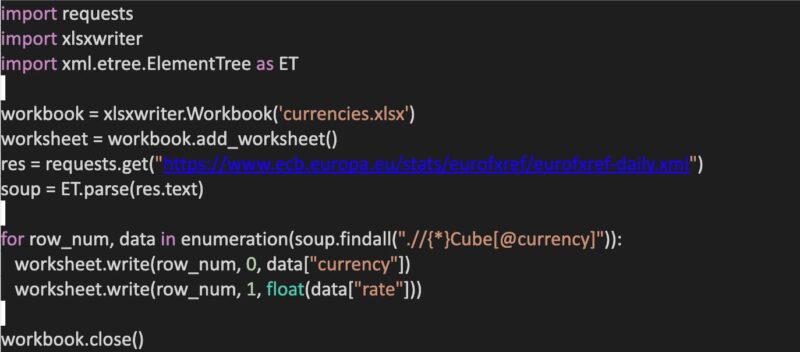
This script is easy to run with this command:
python get_currency_rates.py
However, before running the script, Python needs to be installed on your computer. You can use Python’s package manager, pip, to install two dependencies:
- pip install requests
- pip install xlsxwriter
If you plan to distribute the script to colleagues, they will also need to install the dependencies. But if your co-worker already has an incompatible version of a dependency installed, one of the scripts won’t work. You will then need to distribute a new version of your script manually, and if something goes wrong, you will debug the problem by either paying a visit to your co-worker’s desktop or engaging in a lengthy email exchange.
Fortunately, there is a way to sidestep these challenges. The solution is to transform your Python script into a robot.
“Robot” is a single-package format for your Python script. In addition to the relevant code, it contains information about the dependencies, environment variables and the command to run the robot.
To make your Python code run as a Robocorp robot, you need to add two configuration files:
- robot.yaml
- conda.yaml
robot.yaml
This is an example of robot.yaml. Store it next to your .py file or in the root folder of your project.
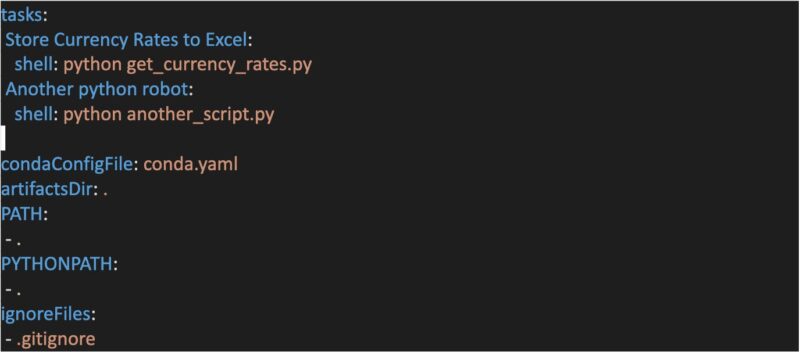
Understanding “tasks”
Tasks define the shell command that is executed when the robot is run. For example, for a Python robot, it would typically be something like “python get_currency_rates.py.”
A robot must have at least one task, but you can add as many as needed. In Robocorp’s Control Room you can use the task’s name to specify the command you want to run, e.g., “Store Currency Rates to Excel.”
In basic robots that is all you need to define and you can leave the rest of the config as is.
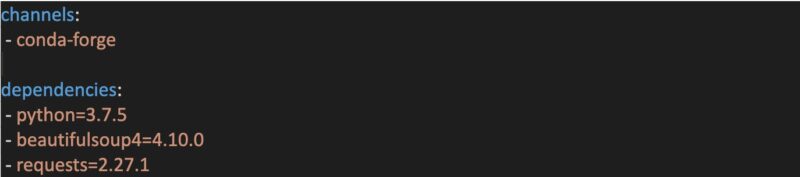
conda.yaml
The file cleverly defines all of the dependencies that your robot needs. Typically, those are Python libraries, but other components, such as web browsers and nodejs, can also be installed with Conda (https://anaconda.org/conda-forge/).
Confused? Let’s take a look at another example. This example adds a specific version of Python and two Python libraries required in order to run the currency robot. All of the dependencies are installed locally without affecting any other Python programs possibly running on the same computer:
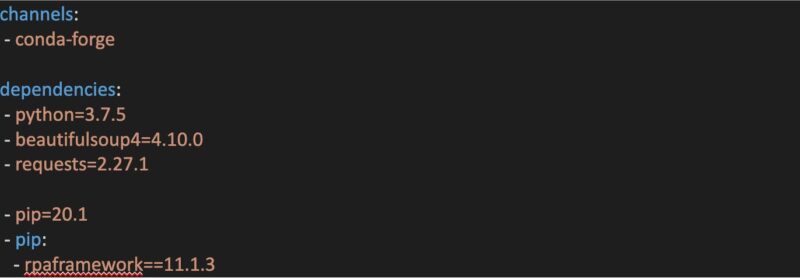
But where are the Python libraries? Most are available from the conda package management, but some packages are only available in PyPI (Python Package Index). These can also be added with conda.yaml. For example, you could add RPA Framework by adding the required components to conda.yaml.
Running the robot
After defining robot.yaml and conda.yaml, the robot is ready to run. Install rcc (https://github.com/robocorp/rcc#getting-started) and use it to run the robot:
rcc run
Note that you need to install only rcc into your computer – python and all dependencies are handled automatically.
The robot format also allows you to easily distribute python code with Robocorp’s Control Room and run it seamlessly in Robocorp Assist or Workforce Agent. Simply use rcc to create a zip package and upload it to the Control Room.
Alternatively, you can store the robot in a GitHub repository and use it in Control Room or locally with rcc:
rcc pull github.com/robocorp/example-google-image-search
rcc run
So there you go. That’s a quick guide to creating a robot in Python. Do you still need help? If so, reach out to the Robocorp team and we’ll get you started!