How to find user interface elements using locators in web applications
The art of helping your robot to find forms to fill in and buttons to click on in web applications.
A "simple" request
-
🙋♀️ Hey, Robot! Click that button for me, will you?
-
🤖 >>> print("PARDON ME?")
-
🙎♀️ That button! Right there!
-
🤖 ERROR: "That button! Right there!" NOT FOUND
What to click, that is the question
Here we have three buttons. To click the (That button!) button, you shout an order at your robot, and it will complete this trivial task, right? As it turns out, it's not quite that simple.
What's under the hood?
To understand what the robot sees, let's take a look at how the above buttons are built. You can use a desktop browser, such as Firefox or Chrome, or some other browser, as long as it comes with developer tools. Those tools provide developers with great powers, such as inspecting the HTML elements on a web page.
Locators are the common name for finding elements using the different strategies, such as XPath and CSS. When you use the VS Code plugins or Automation Studio, the locators get saved in the
locators.jsonfile.
For CSS, the target of the locator is defined using a CSS selector, while XPath uses an XPath expression.
Right-click on the That button! button and select Inspect Element (Firefox) or Inspect (Chrome). An Inspector view opens. Moving your mouse cursor over the HTML markup in the inspector highlights the corresponding elements in the browser window.
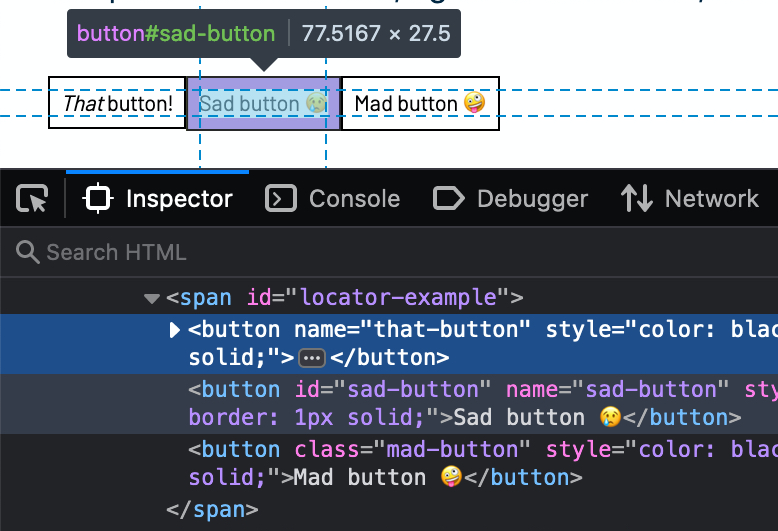
Here is the HTML markup of the buttons:
Grabbing the CSS selector
To click the button, the robot needs to locate it first. To grab the selector, right-click on the <button name="that-button"... element in the inspector. Select Copy -> CSS Selector (Firefox), or Copy -> Copy selector (Chrome). The result is the following CSS selector:
Testing the CSS selector
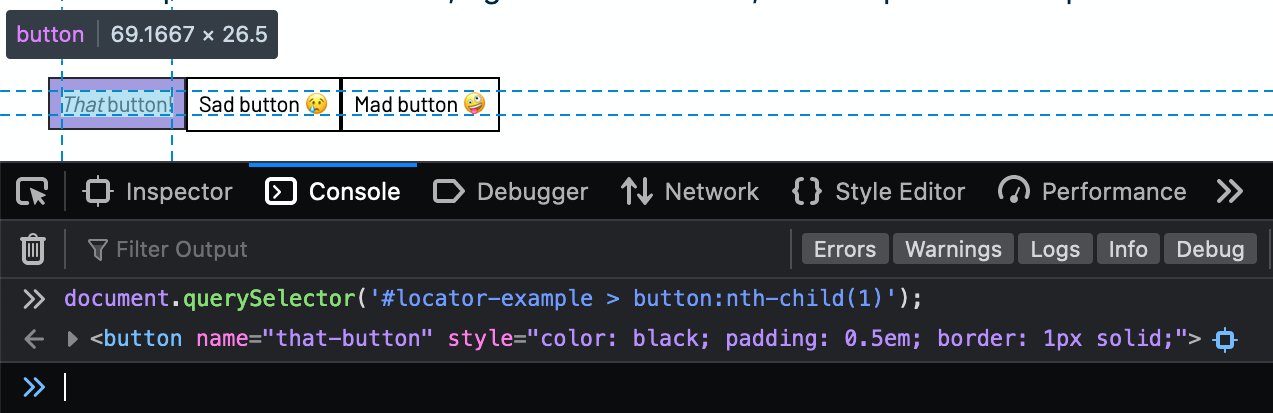
To test the CSS selector, click on the Console tab in the developer tools and run this JavaScript command:
The element matching the CSS selector is printed out in the console. Hovering the mouse cursor on the element in the console highlights it on the web browser window. This way, we can verify that the selector matches the correct element.
We could use the CSS selector in a robot script like this:
The css: prefix uses the CSS locator strategy when locating the element (there are multiple available locator strategies).
Done?
Alright! Commit, push, deploy to production? The selector matches the first button element that has a parent element with an id attribute of locator-example (using the :nth-child() CSS pseudo-class).
What if someone modifies the order of the buttons? The robot would end up clicking on the wrong button since it always clicks the first button! We have to find a more robust selector that will keep working even if the buttons are shuffled around. This is the HTML markup for the button we are interested in:
There is no way to locate the button using the button text (That button!) if we want to continue using CSS selectors. Time to move to other querySelector strategies? Not yet.
Finding a more robust CSS selector
Locating elements by things that might change, such as their exact position or label, can cause your robot to break easily. For example, your robot breaks if someone decides to change the text on the button or translates the text into other languages.
A good selector is one that is unlikely to break often. Good candidates for robust selectors are the id and name attributes of HTML elements. An id attribute must have a unique value in the whole HTML document. Locating an element using the id attribute is thus a good option (assuming the value is static and does not change dynamically). The name attribute used with many form elements does not have to be unique but is often good enough for automation purposes. We could modify the CSS selector like this to use the value of the name attribute:
Make it as simple as possible, but no simpler
If we have only one button named that-button in our HTML document, we can further simplify the selector by omitting the #locator-example > part, making the selector less strict:
Our robot keyword might look like this:
The Click Button keyword has built-in logic for locating buttons by their id, name, and value attributes. We can reduce the selector to a really short form:
If you want to communicate that you are relying on the name attribute for locating the button, you can use the name: strategy prefix:
One selector to rule them all
Automatic selector extraction works best when the element has a unique id attribute. Right-click on the <button id="sad-button"... element in the inspector. Select Copy -> CSS Selector (Firefox), or Copy -> Copy selector (Chrome). The result is the following CSS selector:
Whenever it is possible, use id attribute selectors. They are typically the most robust ones and target exactly the elements you want. In this case, both Firefox and Chrome automatically chose the id as the selector. We could use the CSS id selector in a robot script like this:
If you want to communicate that you are relying on the id attribute for locating the button, you can use the id: strategy prefix:
Who are you? - No one.
What if the element lacks both id and name attributes? If the element has CSS classes, we could use those for locating. Right-click on the <button class="mad-button"... element in the inspector. Select Copy -> CSS Selector (Firefox), or Copy -> Copy selector (Chrome). The results are the following CSS selectors:
Firefox:
Chrome:
We could use the CSS class selector in a robot script like this:
Other locator strategies: XPath expression
Right-click on the <button name="that-button"... element in the inspector. Select Copy -> XPath (Firefox), or Copy -> Copy XPath (Chrome). The results are the following XPath expressions:
Firefox:
Chrome:
Testing the XPath expression
To test the XPath expression, click on the Console tab in the developer tools and run this command:
The $x(...) statement works in both Firefox and Chrome for executing XPath expressions. We could use the XPath expression in a robot script like this, using the xpath: locator strategy prefix:
Analyzing the XPath expression
Firefox provides the full XPath from the root html element to the button. This type of expression will break easily, as any HTML structure changes will cause the expression to fail. Chrome does a better job here (if we consider it better as in "more robust for our use case"). Chrome's XPath expression reads: "The first button element under a parent element that has an id attribute with the value of locator-example.". Neither of these XPath expressions is as robust as the id or name attribute CSS selectors.
Use cases for the XPath expression strategy
XPath is useful in cases where the CSS strategy does not work. XPath works, for example, in cases where you need to select the parent of a child element. CSS works only for cases where you select a specific element or a child element. Traversing to the parent element is not currently supported by the CSS specification.
See the Web scraper robot for an example where an XPath expression is used to find tweet elements by the text they contain (user name). The user name is inside a child element of the parent tweet element, a perfect use case for the XPath expression strategy.
Automatic vs. manual selection for locators
It is recommended to select and fine-tune locators manually. Some of the automatically detected locators might be good enough. Still, you want to use the most robust version you can to avoid your robot breaking whenever the application changes even just a bit. The automatic locator extraction works well when the element has an id attribute (assuming the value of the attribute does not change).
If the application you are automating is under your control, try to add static id and name attributes, or well-named CSS classes to your elements. These rarely change, and they avoid issues with text labels since those might change quite often. They also assist with automated testing efforts. The easier it is to target elements in your application, the easier it is to automate.
Try the CSS selector strategy first (typically simpler and also faster to execute). If that fails, try the XPath expression strategy.