Robocorp Visual Studio Code Overview
Install the Robocorp Code extension for Visual Studio Code from the Visual Studio Marketplace.

Robocorp Code extension provides the toolchain to create, run and deploy bots as well as the Robocorp activity bar.
Robocorp activity bar and Command palette
Robocorp Code extension brings in the Robocorp activity bar. From the activity bar, you can find most of the commands with UI buttons to perform them.

All commands are also available via Command palette:
- Windows/Linux:
Ctrl+Shift+P, macOS:Shift+Command+P - Type
robocorpto see the list or type what you are looking for, likerun robot
Creating a new robot
- Open the Command Palette:
Ctrl+Shift+P(macOS:Shift+Command+P). - Select
Robocorp: Create Robot. - Select a template.
Running the robot
Running using Command Palette
- Open the Command Palette:
Ctrl+Shift+P(macOS:Shift+Command+P). - Select
Robocorp: Run Robot. - If you have multiple robots in the opened directory, select the one you want to run.
Running using the Activity Bar
- Click the Robocorp icon in the Activity Bar.
- Select the robot and the task.
- Click the launch icon.
Debugging the robot
You can add breakpoints and debug the robot execution.
Important: Disable the
Python > Experimentssetting. Otherwise, setting the Python path will fail.
- Open the Command Palette:
Ctrl+Shift+P(macOS:Shift+Command+P). - Select
Robocorp: Set python executable based on robot.yaml. - Add a breakpoint in the robot script.
Debugging using the Command Palette
- Open the Command Palette:
Ctrl+Shift+P(macOS:Shift+Command+P). - Select
Robocorp: Debug Robot.
Debugging using the Activity Bar
- Click the Robocorp icon in the Activity Bar.
- Select the robot and the task.
- Click the debug icon.
Linking to Control Room
- Open the Command Palette:
Ctrl+Shift+P(macOS:Shift+Command+P). - Select
Robocorp: Link to Control Room. - Press
Enterto open Control Room, where you can add new access credentials. - Click
+ New Access Credential. - Provide a name, click
Add. - Click on the
Viewicon. - Click
Copy to clipboard. - In VS Code, paste the access credential you copied from Control Room.
Unlinking and removing credentials from Control Room
- Open the Command Palette:
Ctrl+Shift+P(macOS:Shift+Command+P). - Select
Robocorp: Unlink and remove credentials from Control Room.
Uploading the robot to Control Room
- Open the Command Palette:
Ctrl+Shift+P(macOS:Shift+Command+P). - Select
Robocorp: Upload Robot to the Control Room. - Select a workspace.
- Create a new robot or select an existing robot to overwrite.
Connecting to Control Room vault
- Open the Command Palette:
Ctrl+Shift+P(macOS:Shift+Command+P). - Select
Robocorp: Connect to online secrets vault. - Select the correct workspace and the extension will enable the Vault.
- You can now use Vault secrets defined in the Control Room without local
vault.jsonfiles.
Disconnecting from Control Room vault
- Open the Command Palette:
Ctrl+Shift+P(macOS:Shift+Command+P). - Select
Robocorp: Disconnect from online secrets vault.
Using work items
Key concepts
Work items created and used in VS Code are for local development and testing only; they do not affect or transfer to Control Room executions.
For development, work items are just folders under devdata:
work-items-in: Folder to store your input work items.work-items-out: Folder where the execution places the work item outputs. These should be excluded in.gitignoreas outputs are changing and dynamic.work-items.jsonis a reserved file name used to identify work item structures; you can define multiple work items in it. If your work item uses files, you should place those files into the work item folder.
Usage
You can find the Work items panel in the Robocorp Code extension activity bar.
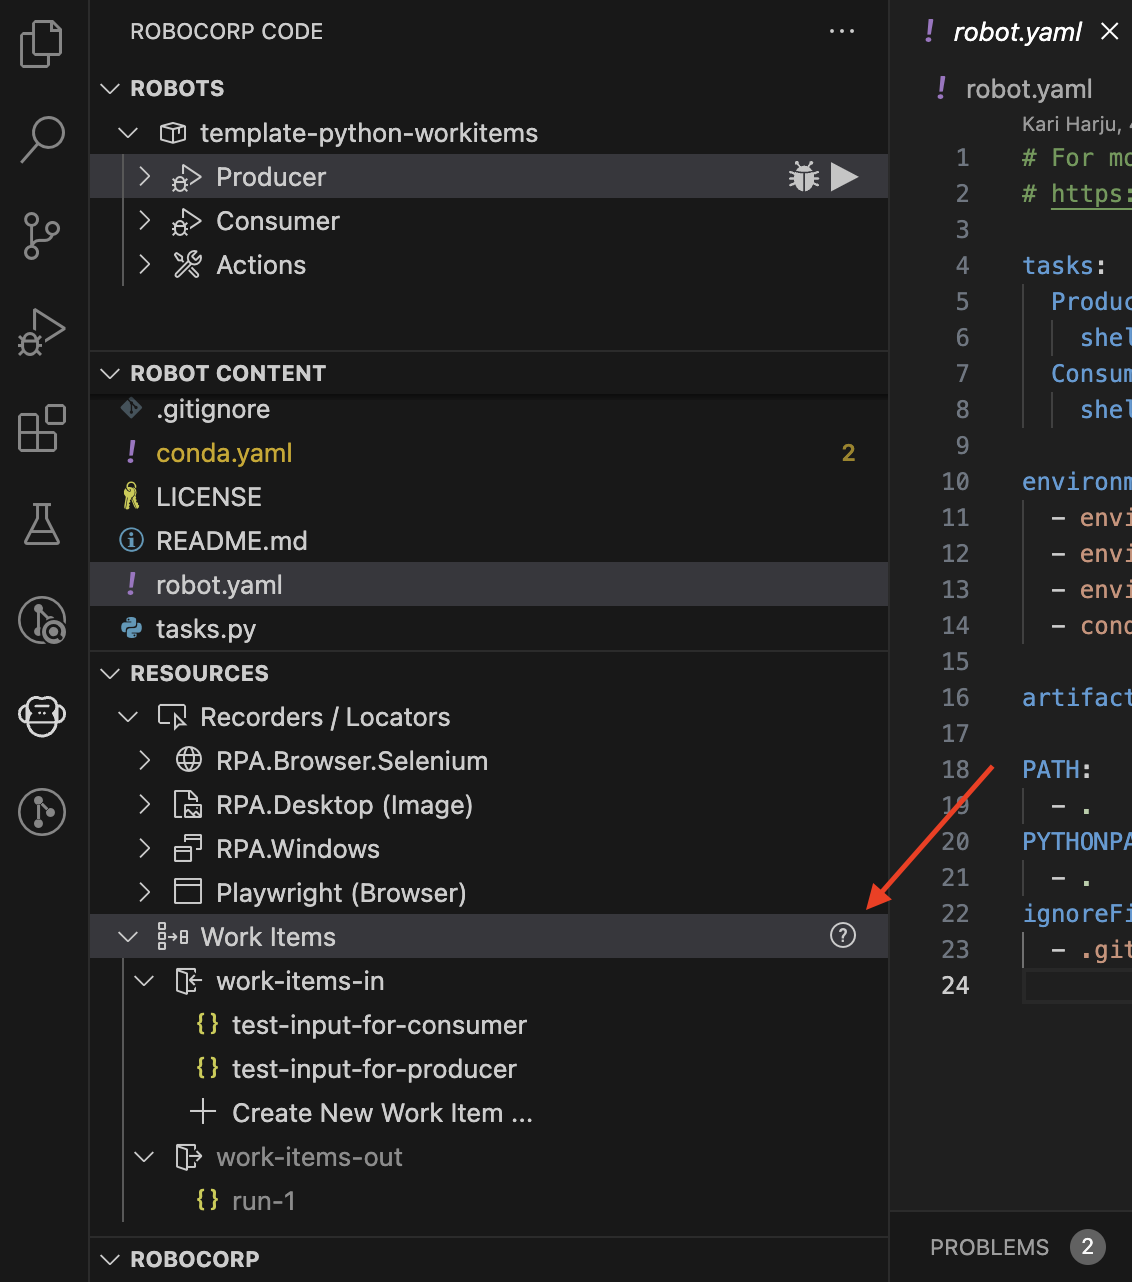
From the Work items panel, you can...
- Create new work item inputs, bringing in template content to get started.
- Open work items to view and edit.
- See the output work items from previous runs >
work-items-out. - Copy a run output work item as an input work item.
- Delete work items.
- If the robot contains work items, the execution of the robot will ask you which work item you want to use as input. You can select inputs and previous run outputs for execution:

Saving locators in VS Code
- Click the Robocorp icon in the Activity Bar.
- Select a robot in the
Robotspanel. - From the
Locatorspanel, selectAdd Browser Locator,Add Image Locator, orAdd Windows Locator.
- The UI Inspector opens.
- Follow the instructions on the UI Inspector interface.
- When you save the locators, you can use them with the
alias:-prefix in your Robot codeClick Button alias:SubmitButton- Saving locators makes them re-usable and eases maintenance tasks later on.
- NOTE:
alias:will not work with Playwright
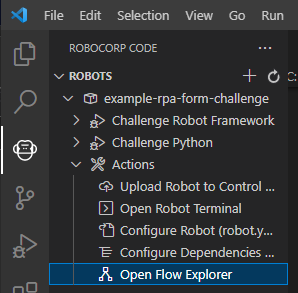
Flow Explorer
⚠️ For Robot Framework robots only.
Robot Framework Flow Explorer gives you a visual presentation of your robots flow into a browser window. The flow explorer targets the active .robot file in VS Code. Flow Explorer can be accessed via Command Palette or via the extension side bar
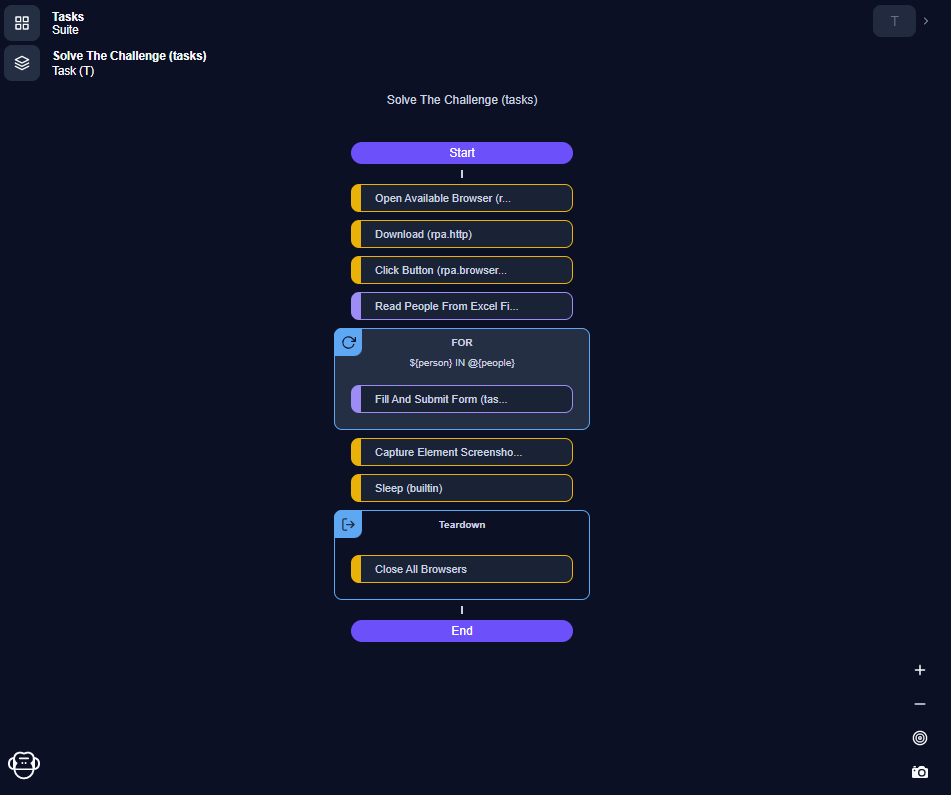
- Open your
tasks.robot-file (or .robot file of your choosing) - Via Command Palette:
Ctrl+Shift+P(macOS:Shift+Command+P).- Select
Robot Framework: Open Robot Flow Explorer.
- Select
- Via Robocorp activity bar
Import and switch profiles
For companies that are using SSO with Robocorp Control Room or have stricter/complex network setups like network proxies etc., the user needs a profile configuration
You can import and switch profiles in the side panel or via command-palette commands: Robocorp: Import Profile and Robocorp: Switch Profile

You can use Robocorp Setup Utility to create the profiles. It provides UI tooling to create, test, export, and manage the profile configs.
In short use:
Robocorp Setup Utilityto create and test the profile configuration that works in your network.- Export and deliver the single
.yaml-file to the VS Code user
Open a Robot environment terminal session
- Open the Command Palette:
Ctrl+Shift+P(macOS:Shift+Command+P). - Select
Robocorp: Terminal with Robot environment.
Clear Robocorp (RCC) environments
- Open the Command Palette:
Ctrl+Shift+P(macOS:Shift+Command+P). - Select
Robocorp: Clear Robocorp (RCC) environments and restart Robocorp Code.
Video instructions
You can also see the whole workflow and follow along in this short video series:
Watch us code a complete robot from scratch in this live-coding video. The robot Google Translates song lyrics from source to target language and saves the original and the translated lyrics as text files:
Changelog
View the Robocorp extension changelog to keep up-to-date with improvements and new features!