Java locators in Visual Studio Code
When dealing with Java applications, there is no better way of detecting application elements than the Java Inspector.
The Java Inspector has the ability of live picking elements from the targeted Java Application and build relevant Java locators for said elements.
👉 Both the Java Inspector and the Java locators use the Java Access Bridge technology and need the Java(TM) SE Runtime Environment (at least version
1.8.x) to be installed locally.
👉 By using the Java Access Bridge, the Java Inspector and the Java locators are restricted to work only on 64bit Windows OS.
The RPA.JavaAccessBridge
The RPA.JavaAccessBridge library is built only for 64-bit Windows OS. It utilizes the java-access-bridge-wrapper package to interact with Java Application UI.
To build an environment that can potentially aid in using the Java Inspector and the Java locators, the following template can be useful.
After installing the Java(TM) SE Runtime Environment, the Access Bridge needs to be enabled by executing: C:\path\to\java\bin\jabswitch -enable
The RC_JAVA_ACCESS_BRIDGE_DLL environment variable needs to be set as well to ensure the Bridge's proper connection:
set RC_JAVA_ACCESS_BRIDGE_DLL=C:\path\to\Java\bin\WindowsAccessBridge-64.dll
⚠️ The local environment might need to be restarted for the Java Access Bridge to be fully activated.
The Java Inspector
The Java Inspector comes packaged with the Robocorp Code VS Code Extension.
Once you have installed the extension in your VS Code environment, there are several ways of accessing the Java Inspector.
- Click the
Robocorp Codeicon in the Activity Bar. - From the
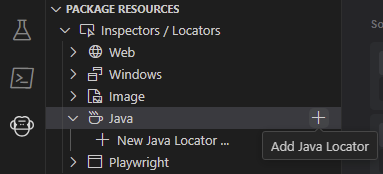
Package Resourcespanel, expand theJavamenu and selectNew Java Locator ....
- Access it from the VS Code Command Pallette:

The
Java Inspectorwill automatically try to enable thejabswitchand set theRC_JAVA_ACCESS_BRIDGE_DLLfor the environment. The first time doing this, the environment will change and a restart might be needed for the Java Access Bridge to be fully activated.
Create a new automation flow
A Robocorp Inspector tab will appear inside VS Code:

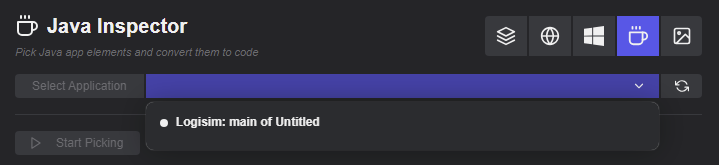
Select the Java Inspector from the Robocorp Inspector menu bar if not already selected.
Once selected, the Java Inspector will automatically start detecting all the locally opened Java applications. It will not automatically select one for you.
The first step is to select an application from the dropdown list. Applications will be identified by their application name.
Once the application is selected, there are three ways in how the Inspector allows and aids building Java locators:
Live Picking- hover the mouse cursor on top of an application elementTree Exploring- explore the application tree node by nodeLocator Builder- write the Java locator value directly in the editor and Test the value
Live Picking
When selecting the application, the Inspector will automatically Start Picking.
The selected Java Application will pop up to the foreground.
All that is needed now is for the mouse cursor to hover on top of the Java Application elements that need locating.
The selected element will be highlighted:

The Application Tree in the Java Inspector will also be updated and the picked element will be the selected one as well.
Elements can be picked again and again.
Tree Exploring
The same effect as the Picking cycle can be achieved by exploring the application tree.
The main difference is that, exploring the tree means traveling node by node, layer by layer, until the targeted element is reached. In cases in which Picking doesn't help, exploring the tree might come in handy.
Exploring the tree happens from a top-down perspective, going from larger elements to their containing children.
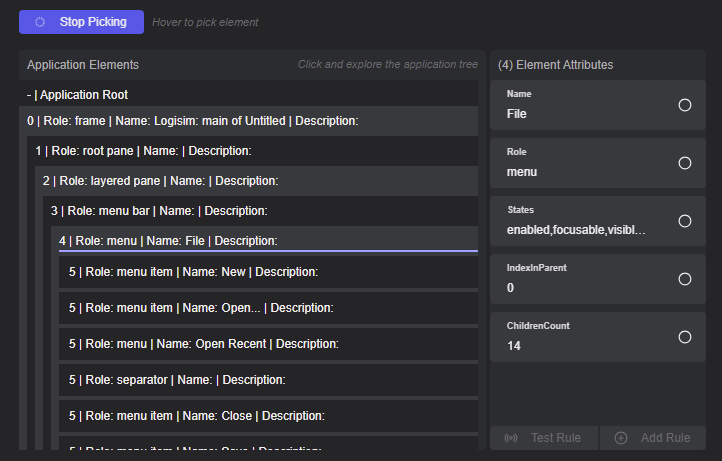
Once a valid element is activated the relevant Element Attributes are populated in the right panel.
From the Element Attributes panel, different attributes can be selected as a Rule. To Test Rule is to verify if the selected attributes can construct a valid locator and if the Inspector can use the valid locator to detect elements in the Java Application. The Inspector will notify if the locator isn't valid or how many elements it finds.
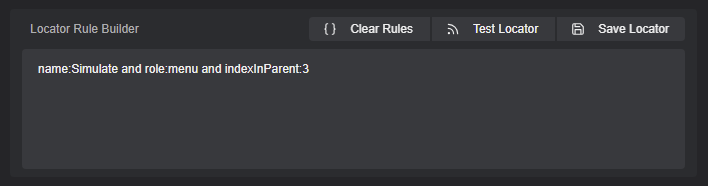
When the Rule is suitable, it can be added to the Locator Builder as a value.
By adding rule after rule, an ancestry locator can be created. Example:
role:menu bar > name:Simulate and role:menu and indexInParent:3
Locator Builder
Or start typing in the Locator Builder.
At any time the Locator Builder input value can be tested by Test Locator. This will validate the syntax of the entire locator value & check how many elements can be detected in the Java Application.
The end goal is to have a Java locator value that satisfies the requirements.
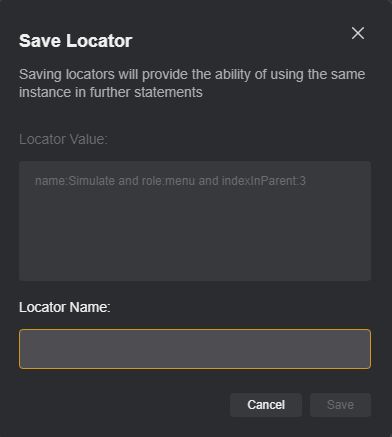
Save Locator
If the goal of having the required locator value is reached, it can easily be copied to the intended code or the Java Locator can be saved for later use. The only thing that needs to be provided is a name.
Once the locator is saved, you can find it in the Locators Manager by navigating to it from the Robocorp Inspector menu bar.

Locator use
The Java Locator, particularly it's value, can be used in code.
The value can be copy-pasted from the Locator Builder or from the Locators Manager.
Here is an example how the various Java Locators can be used in Python: