Your first robot
Introduction to robots 🤖
A brief pause to go through what we mean by a robot. In Robocorp terminology, a robot is a folder or a zip file packaged in a specific way that contains everything needed to run the automation.
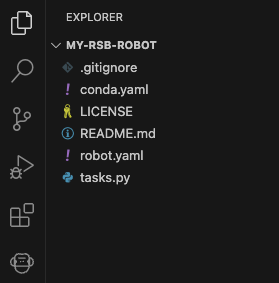
View the structure of your robot
Once you have your newly created robot open in VS Code, you will see files on the left of the screen. The robot needs to have those files in place to work correctly.
Open the python file
Click the tasks.py file to open it in the editor. The robot looks something like this:
The task of this robot is to save in a variable the string "Hello World!".
Run the robot
Great! Let's try running this simple robot to see what happens.
There are two main ways to run your robot. You can clickety-click with your mouse or typety-type with your keyboard. Let's look at both options.
Run the robot from the Robocorp Code extension user interface
Look at the left side of your VS Code screen. There's a vertical bar with a bunch of icons. You should see a monkey icon there. That's the icon for the Robocorp Code extension!
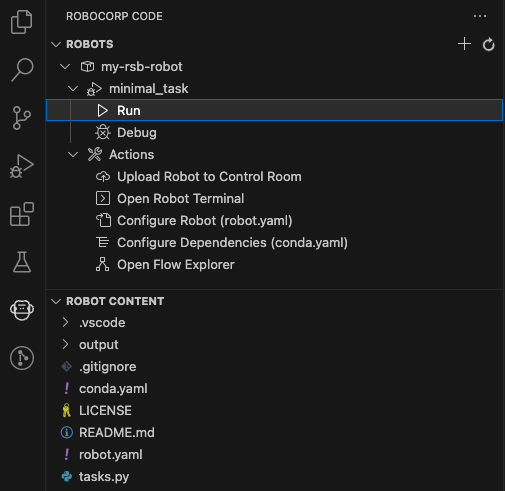
- Click the monkey icon. A
ROBOCORP CODEpanel opens. - In the
ROBOTSsection, clickmy-rsb-robot. - Hover your mouse cursor over
minimal_taskand click theLaunch Taskicon on the right. It looks like a play button.
The robot starts running!
The run might take a bit of time the first time you do it. An execution environment will be automatically set up for your robot based on the contents of the
conda.yamlconfiguration file. Subsequent runs are much faster since the environment is already set up. Neat!
The environment consists of many small files, and if you happen to have a virus scanner on your machine (for example, Windows Defender), it will probably want to take a look at all those files, which will add to the waiting time. 🔎
The TERMINAL panel
You will see a lot of things happening in the TERMINAL panel at the bottom right of your VS Code screen. Eventually, you should see something like this in the terminal output:
PASS means the task completed successfully. Before diving in deeper into the results of the run, let's see the keyboard-way-of-running-things.
Run the robot using your keyboard
Learning keyboard shortcuts is a skill that saves you time and helps you complete things faster.
VS Code provides a helpful tool called Command Palette. It's a handy helper that lets you quickly find and run any command you need - including running your robot!

- Open the Command Palette by pressing
Shift-Command-P(macOS) orCtrl+Shift+P(Windows). - Type
run robot. This will find the command you need. - Press
Enterto run theRobocorp: Run Robotcommand.
The Command Palette will remember the last command you ran. This is super handy when you want to run your robot many times when testing it. Just open the Command Palette and press
Enter. The last ran command will be executed! Warp Speed, Scotty! 🚀
View the task log
Your robot writes a detailed log of everything it did during the execution of the task. There are a few ways to find and view the log.
Opening the log from the terminal panel
In the TERMINAL panel, the penultimate line of the output is the path to the log file. You can open it in your default browser by holding Command (macOS) or Ctrl (Windows) and left-clicking the path with your mouse.
Leave the browser window/tab open. Refresh the window anytime you want to see the latest log output.
Optional: Finding the log file in file system
You can skip this part for now! It is still good to know where to find the actual log file if you happen to need it!
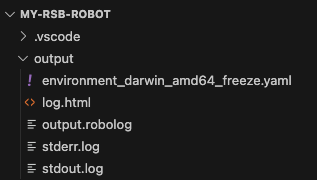
You can find the log file from the Explorer panel (click on the Explorer icon in the vertical toolbar - it's the topmost one that looks like a bunch of documents).
Click the output folder. You will find files. The log.html file is an HTML file you can view in any web browser.
Optional: Installing a VS Code web browser extension to open HTML files
You can skip this part and return to it if you find you want to open any HTML files in browser!
VS Code does not provide a default way to open an HTML file in a web browser. To add this functionality, install the open in browser extension.
Similar to the Robocorp Code extension, the open in browser extension, well, extends, the capabilities of VS Code by adding support for new functionality. There is an extension available for practically anything you need! If you know and prefer some other web browser extensions, you can use those, too!
After installing the open in browser extension, right-click on the log.html file and select Open In Default Browser. The log file will be opened in a new browser window or a tab.
View the log in browser
In the log file, next to tasks.py heading, you will see a green bubble with "Run passed".
Under the heading, click on the > icon next to "minimal_task" to expand it's contents.
Do this with every > bellow our task and you will now see the full logs.
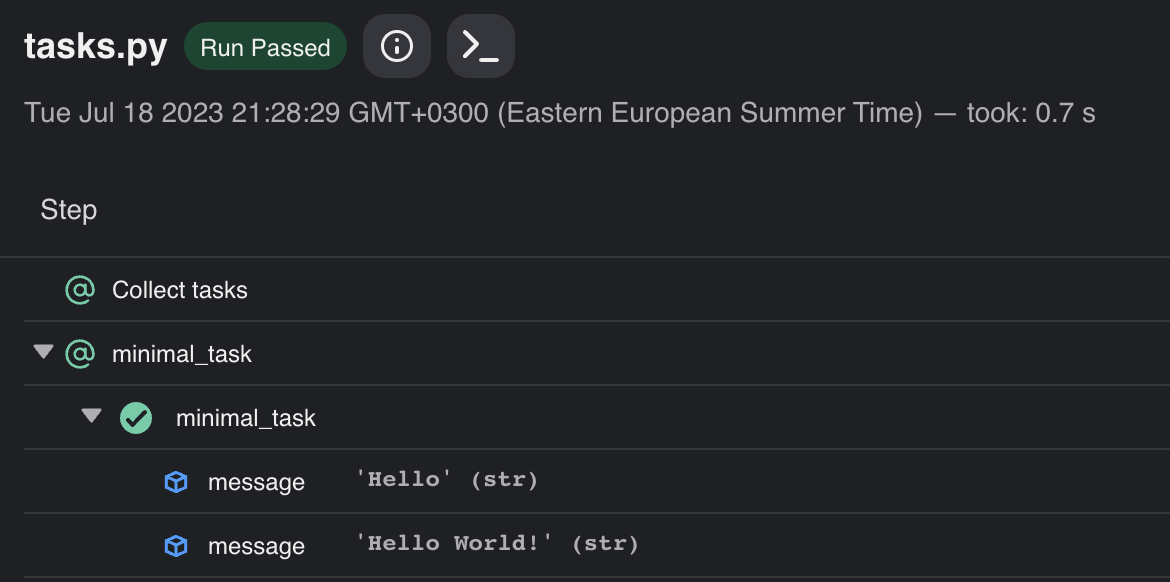
Hurray! Our robot ran succesfully! 😀
Anatomy of your robot 🤖
What are small robots made of? Of imports, tasks definitions, and function definitions, mostly!
This robot has two logical sections for now.
The imports area typically contains libraries imports and references to other files.
This robot contains only one import, task from robocorp.tasks.
The next section defines the tasks for the robot. Here we can see one task (there could be more than one).
The name of the task is minimal_task and is annotated with @task decorator.
Our robot uses @task to determine the entry point(s) to your automation scripts.
To complete the task, the robot sets the value of message variable to "Hello World!".
Think of a variable as a container for stuff, such as our message, Hello World!.
We'll discuss the robot anatomy in more detail in the next chapter, where you will teach your robot to open the RobotSpareBin intranet in a web browser.
What we learned
- You can run your robot from the user interface or using your keyboard.
- An execution environment is automatically created based on the
conda.yamlconfiguration file when the robot is run. The environment is cached, meaning that using the same environment is super-fast after it has been created once! - When you run your robot, a detailed log file is created.
- @task determines the entry point(s) to your automation scripts.
- You can open the log in your default browser by holding
Command(macOS) orCtrl(Windows) and left-clicking the log file path in the terminal pane with your mouse. - VS Code with the Robocorp Code extension provides all-the-things needed for creating robots.
- You can add functionality to VS Code by installing extensions.
- Keyboard shortcuts save you time and help you complete things faster.
- Determining the average air speed velocity of a laden swallow is complicated. 🕊